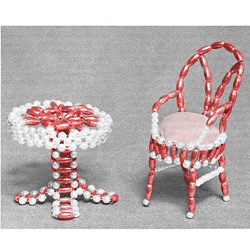
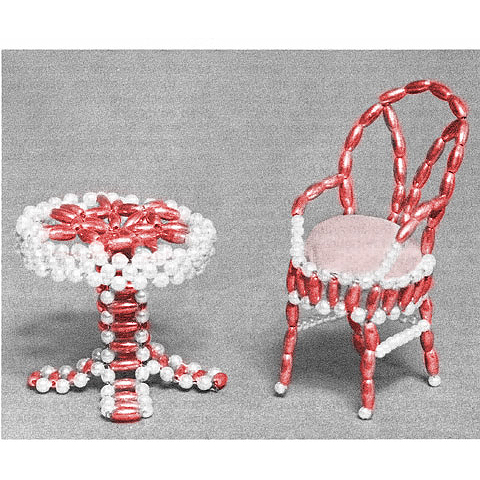
NOTE:To avoid kinks in the wire as you work, hold wire close to beads that wire is going through, with thumb and index finger keeping wire straight. You may wish to use needle-nose pliers to pull wire through in difficult places.
Chair
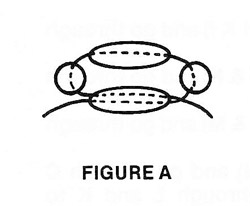
1. Center one 3mm pearl, one oat, one 3mm pearl and one oat on a 20" piece of wire. Put left wire through last oat added and pull tight (Figure A).
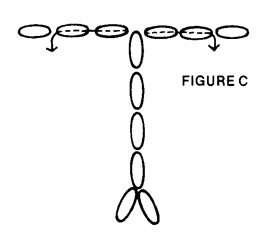
2. Add one 3mm pearl and one oat to right wire. Add one 3mm pearl to left wire. Put left wire through oat added to right wire (Figure B).
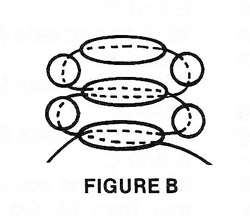
3. Repeat Step 2 until 20 rice beads have been strung.
4. Add one 3mm pearl to each wire and bring both wires through first oat strung (same as done in Step 2), forming a circle. Twist wires together and bend toward inside of circle. Cut off excess.
5. Cut 3 1/2 feet of wire. Bring wire through five 3mm pearls on bottom edge of seat (completed in Step 4) and center wire.
6. String three rice beads and one 2 1/2mm pearl and bring wire back through the three rice beads (front leg). Bring wire through five 3mm pearls along bottom edge of seat.
7. Add three rice beads and one 2 1/2mm pearl and bring wire back through the three rice beads (back leg). Bring wire through the next five 3mm pearls along bottom edge.
8. Repeat Step 7 to add another back leg to chair.
9. Add three rice beads and one 2 1/2mm pearl to wire. Bring wire back through rice beads (second front leg) and through oat bead directly above (bottom of seat.)
10. Using long wire remaining, go down through one oat in front leg. Add eight 2 1/2mm pearls. Bring wire around back leg between first and second rice beads (one oat down from seat).
11. String eight 2 1/2mm pearls and bring wire around other back leg between first and second rice beads.
12. Add eight more 2 1/2mm pearls to wire and bring wire up through first oat on front leg.
13. Still using same wire, string twelve 2 1/2mm pearls. Cross over bottom of seat to back leg opposite. Bring wire through the five 3mm pearls along back bottom of seat. Add five 2 1/2mm pearls and loop tightly around first cross-brace between sixth and seventh pearls. String another five 2 1/2mm pearls and bring wire through the five 3mm pearls along bottom-front edge of seat.
14. Bring wire up through oat directly above (same one as other wire comes through) and wire through five 3mm pearls across top front of seat.
15. Bring each wire back through five 3mm pearls on top edge of seat.
16. Add 14 rice beads to one wire and bring other wire through rice beads from other end.
17. Bring each wire through two 3mm pearls on top edge of center back of seat. *Add five rice beads to one wire. Bring wire down through three rice beads in chair back, going in between fifth and sixth rice beads and coming out between second and third rice beads. Add three rice beads and four 2 1/2mm pearls for arms of chair.*
18. Repeat Step 17 from * to * with other wire to complete other side of chair.
19. Bring one wire through top front edge of seat, fasten to other wire and cut off excess.
Table
1. Using 26" of wire, center one 3mm pearl, one oat, one 3mm pearl and one oat. Bring left wire through last oat added from opposite side (Figure A).
2. Add one 3mm pearl and one oat to right wire. Add one 3mm pearl to left wire and bring left wire through oat added to right wire (Figure B). Continue until 22 rice beads have been used. After going through the last oat with both wires, run each wire, on its side, back along edge through the 3mm pearls to other end of strip. Do not pull wires tight or strip will be pulled out of shape. Bring one wire through the end oat and fasten wires together. Cut off excess.
3. Cut 26" of wire for Legs 3 and 4. String one 3mm pearl, one oat, one 3mm pearl and one oat and center on wire. Bring left wire through last oat added from opposite side.
4. Add one oat and one 3mm pearl to right wire. Add one 3mm pearl to left wire and bring left wire through oat added to right wire.
5. Repeat Step 4.
6. Repeat Step 4.
7. Fold strip completed in Step 2 with ends together. Bring right wire of second stirp through fifth pearl from end of first strip. Run left wire through fifth pearl from opposite end of first strip, with wire running toward center of strip (Figure D).
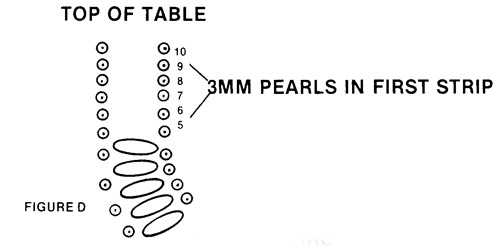
8. Add oat to right wire and bring left wire through from opposite side. Go through sixth 3mm pearl in first strip toward top (top is center of first strip).
9. Repeat Step 8, but go through seventh 3mm pearl.
10. Repeat Step 8, but go through eighth 3mm pearl.
11. Repeat Step 8, but go through ninth 3mm pearl.
12. Add oat to right wire and bring left wire through oat from opposite side. This completes Leg 3. Bring each wire through the tenth oat from end of first strip to opposite side.
13. Add one oat to right wire and bring left wire through oat from opposite side. Bring each wire down through the ninth pearl on its side of first strip.
14. Add oat to right wire and bring left wire through oat on opposite side. Bring each wire down through eighth pearl on its side.
15. Repeat Step 13 three times, first bring wire through seventh 3mm pearl, then the sixth, and, finally, through the fifth 3mm pearl.
16. Add one oat to right wire and bring left wire through oat from opposite side.
17. Add 3mm pearl and one oat to right wire. Add 3mm pearl to left wire. Bring left wire through oat on right wire from opposite side.
18. Repeat Step 17 three times.
19. Bring right wire up through first four 3mm pearls on right side. Bring left wire up through first four 3mm pearls on left side.
20. Bring right wire through the fifth oat from bottom of first strip to opposite side. Bring left wire through fifth oat from bottom of first strip to opposite side. Bring each wire back down through 3mm pearls.
21. Bring one wire through bottom oat and fasten ends together. Do not pull wires tight. Cut off excess wire. Legs are now completed.
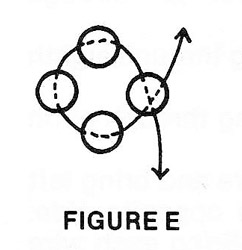
22. Cut 18" of wire for edge of table top. String four 3mm pearls and center on wire. Bring left wire through last 3mm pearl on right wire to form a circle (Figure E).
23. Add two 3mm pearls to right wire. Add one 3mm pearl to left wire and bring left wire through last 3mm pearl on right wire (Figure F).
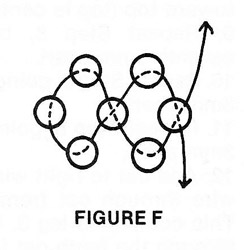
24. Repeat Step 23 until 27 sets have been added. (Count the number of pearls along the side of the strip. There will be 15 when Set 15 is done; 27 when Set 27 is completed.)
25. Add one 3mm pearl to each wire and bring each wire through the end 3mm pearl of Step 22 from opposite sides. (This forms a circle.) Fasten ends of wire together neatly on inside.
26. Cut 24" of wire for table top. Add three rice beads (A, B, C) to wire and bring one end through A, forming a triangle and leaving a 3" tail of wire. Refer to Figure G for Steps 27 through 32.
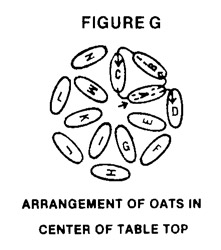
27. Add two rice beads (D & E) and go through beginning oat A and then D.
28. Add two rice beads (F & G) and go through E and F.
29. Add two rice beads (H & I) and go through G and H.
30. Add two rice beads (J & K) and go through I and K.
31. Add two rice beads (L & M) and go through K and L.
32. Add one oat (M) and go through C and then M. Go through L and K to center.
33. Fasten table top firmly in place on top of legs by running both wires down through center of legs and out opposite sides, under top wire and 3mm pearls in legs. Bring short wire from inside to outside and fasten tightly. Bring long wire through K from inside to outside. The table center should be centered over legs, flat and firmly in place.
34. Add one oat and one 3mm pearl to wire. Go through one 3mm pearl on top edge of table top. Add one 3mm pearl and one oat and go through oat in table center (Figure H). Add one oat and one 3mm pearl. Skip three 3mm pearls in outside edge of table and go through next 3mm pearl. Add one 3mm pearl and one oat and go through oat in table center again.
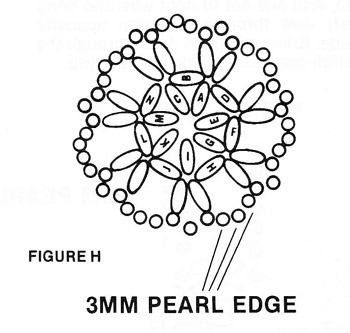
35. Complete table top and fastening, repeating Step 24. You will be going through rice beads B, D, F, H, J, L and N.
Chair Cushion
1. Run a gathering stitch around outside edge of fabric circle, 1/4" from edge.
2. Pull stitching together slightly and begin adding filling. Alternately tighten and stuff until stitches are pulled tightly together and cushion is firm. Tie thread ends together. Stitch over edges several times to secure and to keep raw edges from unraveling.
