1. Open up a safety pin and slip on one 10mm faceted bead, two 12mm starflakes, three 18mm starflakes and two 12mm starflakes. Close the pin and use the pliers to squeeze the head of the pin so that it will not slip open. Make 9 pins with the 10mm beads. We will refer to these as 10mm pins.

2. Cut a 6" piece of wire. Use the pliers to make a loop at one end to hold the pins on. Slip on a 4mrn faceted bead, then slip the wire through the tail end of one 10mm pin, slip on a 4mm, slip through the tail of a 10mm pin, slip on a 4mm and slip through the tail of a 10mm pin. Continue alternating beads and pins (making sure all the pins are facing the same direction) until there are nine pins and nine 4mm beads. Twist the ends of the wire together very tightly (the tighter the wire is pulled the sturdier the tree will be). Trim the wire to a 1/4" and bend the end in toward the center.
3. Make nine more 10mm pins in the same way as in step 1.
4. Open up a pin and slip on two 12mm starflakes, three 18mm starflakes, two 12mm starflakes and one 10mm faceted bead. Make nine of these. These will be referred to as "Step 4" pins.

5. Cut a 10" piece of wire. Make a loop in one end. Slip on a 4mm faceted, then slip through the tail of one 10mm pin, then slip on an 8mm faceted, the slip through the tail of a "Step 4" pin, then slip on a 4mm facted, then through the head of one of the pins of the previous row. Slip on a 4mm faceted, then through the tail of a 10mm pin, then slip on an 8mm faceted, then through the tail of a "Step 4" pin, then slip on a 4mm faceted, then through the head of one of the pins of the previous row. Continue alternating around the row until you have used all the pins made in step 3 and 4 and have slipped through all nine pins of the previous row. Twist wires together and trim as before.
6. Open up a pin and slip on one 10mm faceted bead and eight 12mm starflakes. Close the pins as before. Make eighteen of these. These will be referred to as "Step 6" pins.

7. Open up a pin and slip on one 8mm faceted, three 10mm faceted, close as before. Make eighteen (18) of these. These will be called "Step 7" pins.

8. Cut a 17" piece of wire and make a loop in one end. Slip on one 4mm faceted, slip the wire through the tail end of a "Step 6" pin, slip on one 8mm faceted, slip through the tail end of a "Step 7" pin, slip on a 4mm faceted, slip through the head of one of the pins of the previous row. Then, slip on a 4mm faceted, slip through the tail of a "Step 6" pin, slip on an 8mm faceted, slip through the tail of a "Step 7" pin, slip on a 4mm faceted, slip through the head of one of the pins of the previous row. Continue alternating around the row. Twist and trim off as before.
9. Make eighteen (18) more pins in the same way as in step 7 ("Step 7" pins).
10. Open up a pin and slip on an 8mm faceted, two 10 mm crystal faceted and one 10mm faceted. Close pins as before. Make nine of these "Step 10" pins.
11. Open up a pin and slip on a 6mm faceted and four 8mrn faceted. Close pins as before. Make twenty-seven of these. These will be referred to as "Step 11" pins.
12. Cut a 21" piece of wire and make a loop at one end. (a) Slip on a 4mm faceted, slip through the tail end of a "Step 7" pin, slip on a 4mm faceted, slip through the head of one of the pins of the previous row. (b) Slip through the tail of a "Step 11" pin, slip on a 4mm faceted, slip through the tail of a "Step 10" pin, Slip through the head of one of the pins of the previous row. (c) Slip on a 4mm faceted, slip through the tail of a "Step 11" pin, slip on a 4mm faceted, slip through the head of a pin of the previous row. (d) Slip through the tail of a "Step 7" pin, slip on a 4mm faceted, slip through the tail of a "Step 11" pin, slip through the head of one of the pins of the previous row. Continue repeating (a), (b), (c) and (d) around the row. Twist and trim off as before.

13. Make twenty-seven (27) more pins in the same way as in step 7. Close as before.
14. Make twenty-seven (27) more pins in the same way as in step 6. Close as before.
15. Cut a 25" piece of wire, (a) Slip on a 4mm faceted, slip through the tail of a "Step 7" pin, slip on a 4mm faceted, then slip through the head of one of the pins of the previous row. (b) Slip on a 4mm faceted, slip through the tail of a "Step 6" pin. slip on a 4mm faceted, then slip through the head of the next pin of the previous row. (c) Slip on a 4mm faceted, slip through the tail of a "Step 7" pin, slip on a 4mm faceted, then through the head of the next pin of the previous row. (d) Slip on a 4mm faceted, slip through the tail of a "Step 6" pin, slip on a 4mm faceted, then through the head of the next pin of the previous row. Continue repeating step (a), (b), (c) and (d) around the row. Twist and trim as usual.
16. Make thirty-six (36) pins in the same way as in step 7. Close as before.
17. Open up a pin and slip on an 8mm faceted, and three 10mm faceted. Make eighteen of these. Referred to as "Step 17" pins.
18. Cut a 30" piece of wire and make a loop in one end. (a) Slip on a 4mm faceted, slip wire through the tail of one "Step 7" pin, slip on a 6mm faceted, slip through the head of one of the pins of the previous row. (b) Slip on a 4mm faceted, slip through the tail of a "Step 7" pin. Slip on a 4mm faceted, slip through the tail of a "Step 7" pin, slip on a 6mm faceted, slip through the head of the next pin of the previous row. (c) Slip on a 4mm faceted, slip through the tail of a "Step 17" pin. Slip on a 6mm faceted, slip through the head of the next pin of the previous row. Continue repeating (a), (b) and (c) around the row. Twist and trim wires.
19. Count out twenty-seven pins, leave these pins empty. They will just be for support.
20. Cut a 33" piece of wire and make a loop in one end. Slip on one 6mm faceted, slip through the tail end of an empty pin, slip on a 6mm faceted, slip through the head of one pin of the previous row, slip on a 10mm faceted, slip through the head of the next pin of the previous row. Continue this around the row. Twist and trim off wires.
21. Open up a pin and slip on an 8mm faceted and three 10mm faceted. Close the pin as before. Make twenty-seven of these.
22. Cut a 19" piece of wire and make a loop in one end. Slip on one 6mm faceted, slip through the tail of one of the pins made in step 24 slip on a 6mm faceted, slip through the head of one of the empty pins of the previous row. Continue this around the row. Twist and trim wires.
23. Cut a 24" piece of wire and make a loop in one end. Slip on two 8mm faceted beads, slip through the head of one of the pins of the previous row. Continue this around the row, twist and trim wires.
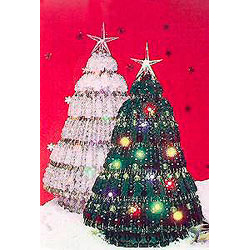
Glue the star into the top of the tree.
When the tree is completed insert ordinary mini tree lights into the cavity of the tree. A thirty-five light strand works great. Using a paperclip or leftover piece of wire formed into a S-hook. Slip the hook onto the center of the lights and hang up in the top of the tree. Arrange the rest of the lights evenly inside the beaded tree. Use small amounts of wire to secure the lights in various places inside the tree.
Enjoy!!


